Background
Learn basic feature of Web Aduio API with some development.
Tools to run this Codelab
Acknowledgement
- Reffed a article of 「Instruction of Web Audio API」 composed by @g200kg a lot, and also using some of the contents, sample codes and diagrams from that article. Thank you very much for sharing those contents to use here.
 Installing Google Chrome
Download suitable package for your platform from here. And click/tap "Add to Chrome" to install.
 Installing Chrome Dev Editor
Please open this URL by Google Chrome, and install the Chrome Dev Editor.
folder_openCreating directory where to build application.
Launch Chrome Dev Editor
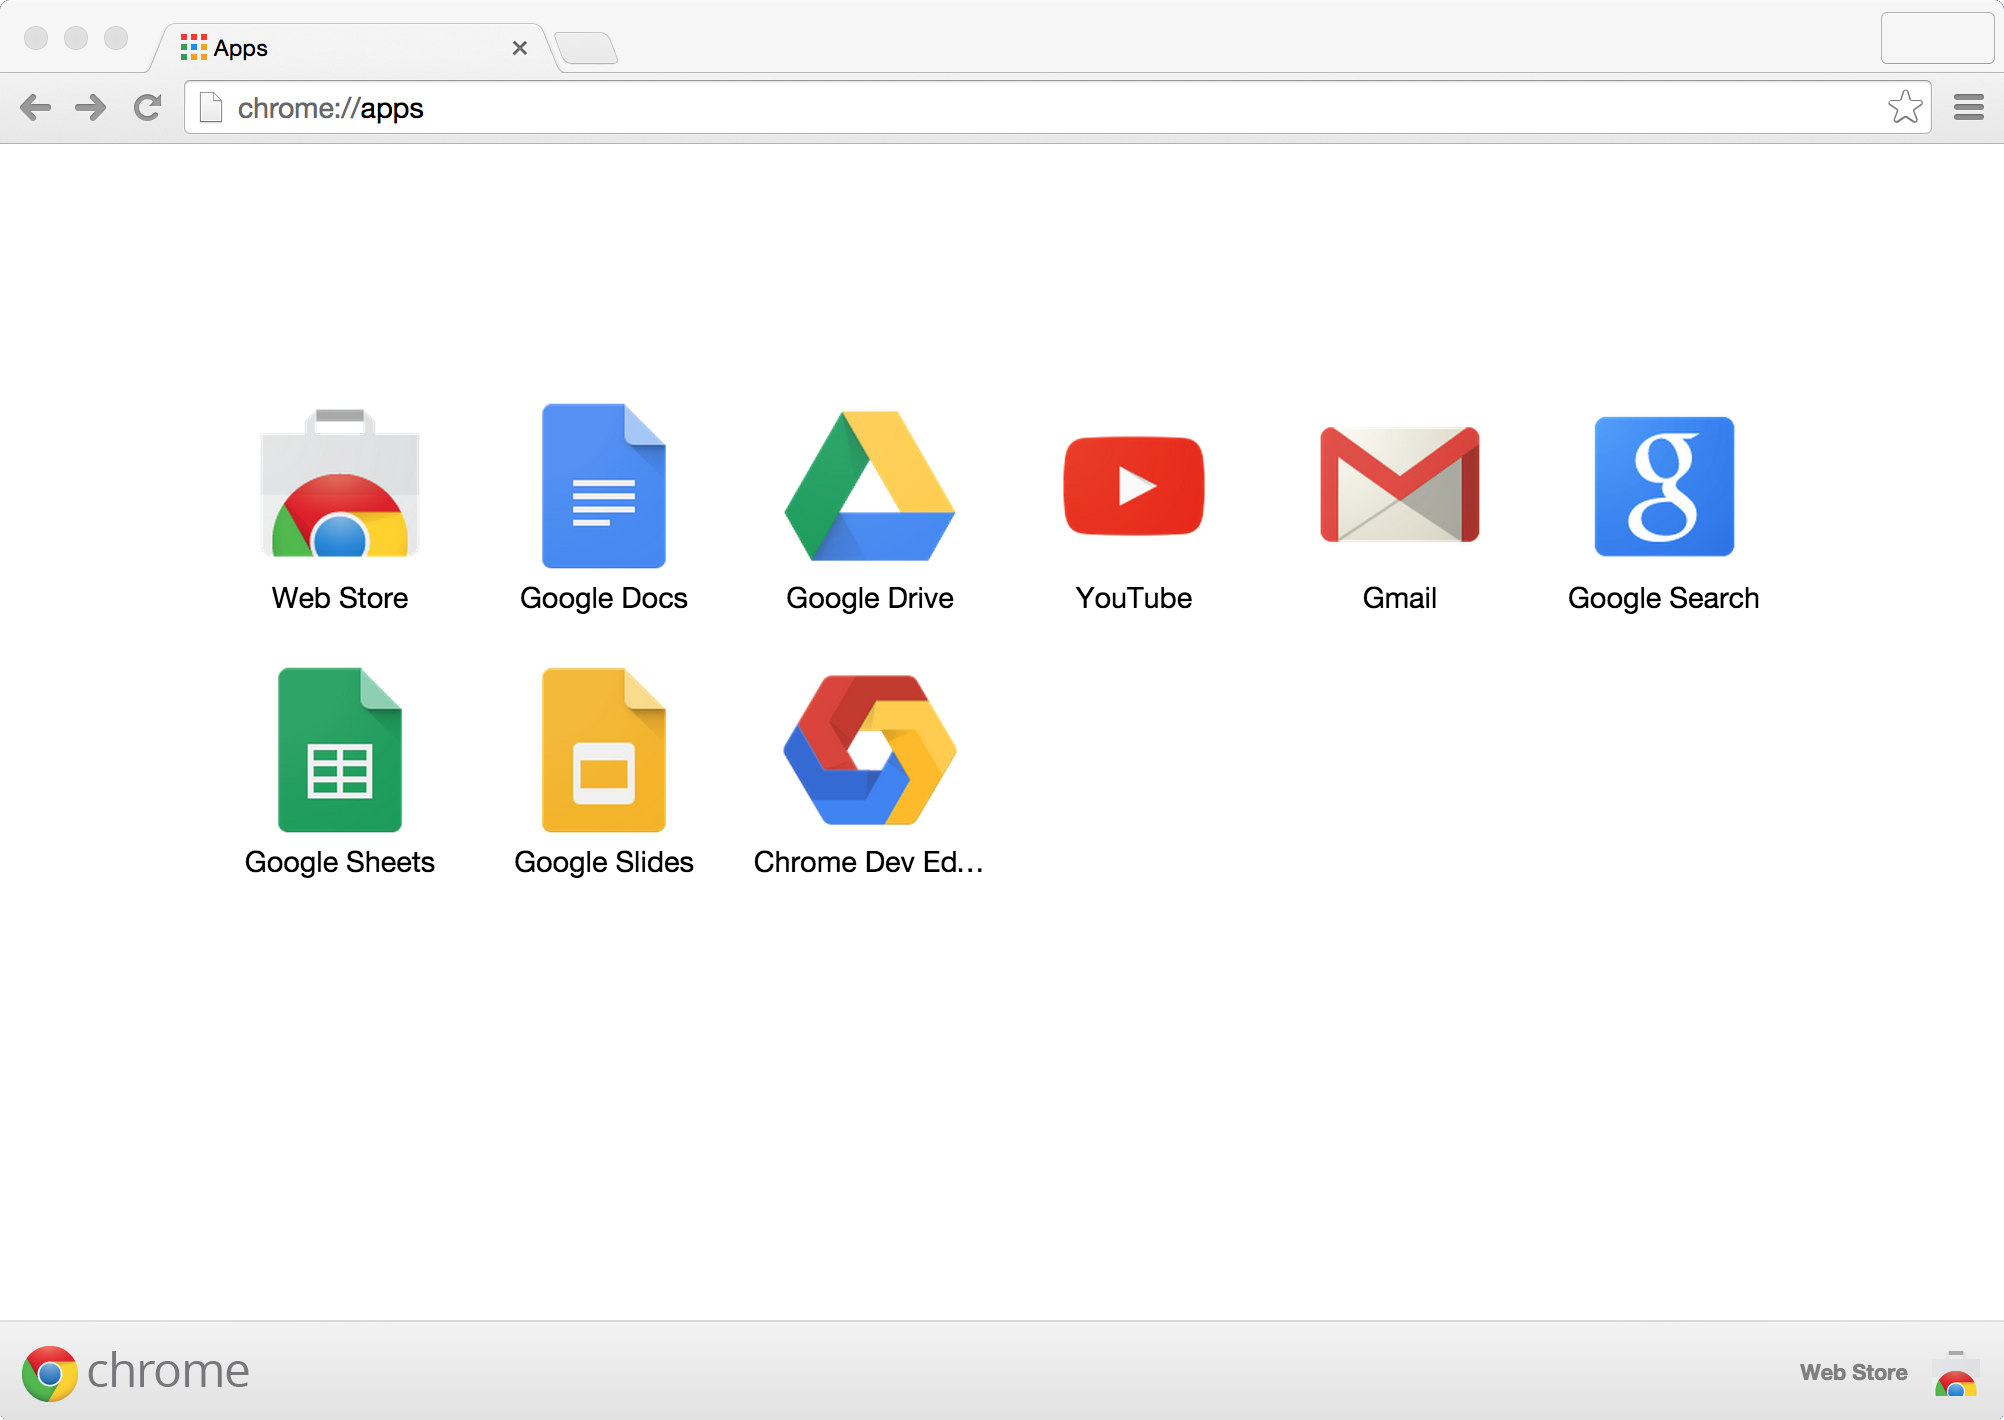
Input chrome://apps in URL bar in Chrome, and Click Chrome Dev Editor to launch Chrome Dev Editor.
Specify the working directory in [CHOOSE FOLDER] area in the dialog of popping up when to click/tap the add_circle button in right corner in below of left pain.
※ First time in launching Chrome Deve Editor, the pop up to specify "Project Name" and "Script type" appears. In here, specifying ~/Documents/chrome_dev_editor/ for that.
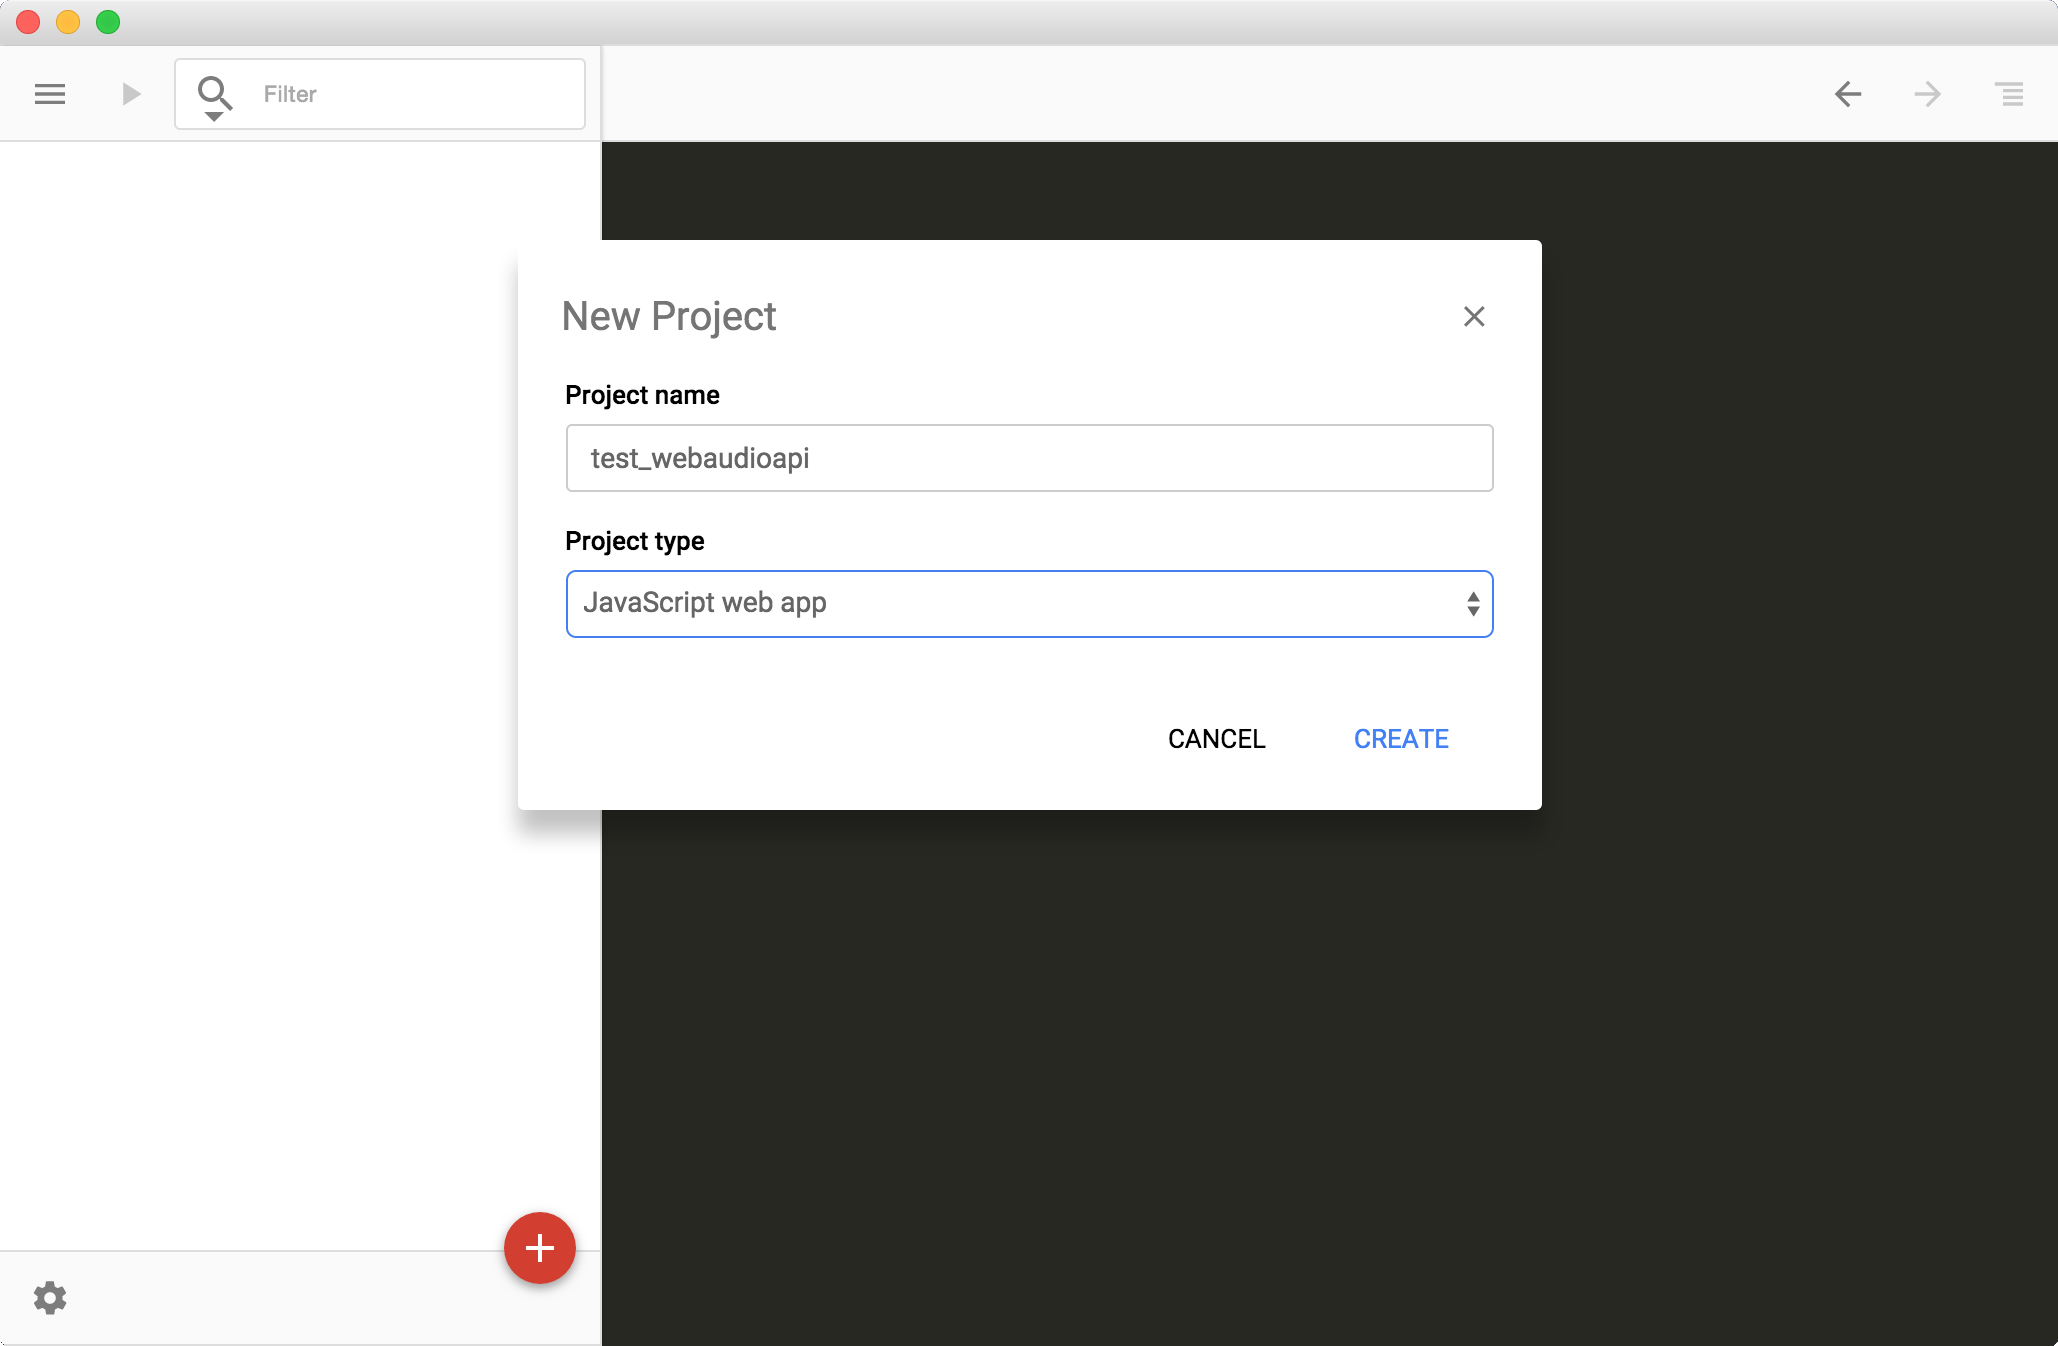
Specifying and selected these values in here.
Project type: JavaScript web app
Play sound by using Oscillator Node.
Copy & paste code below to index.html.
Click/tap play button play_arrow in left top of Chrome Dev Editor to start the application.
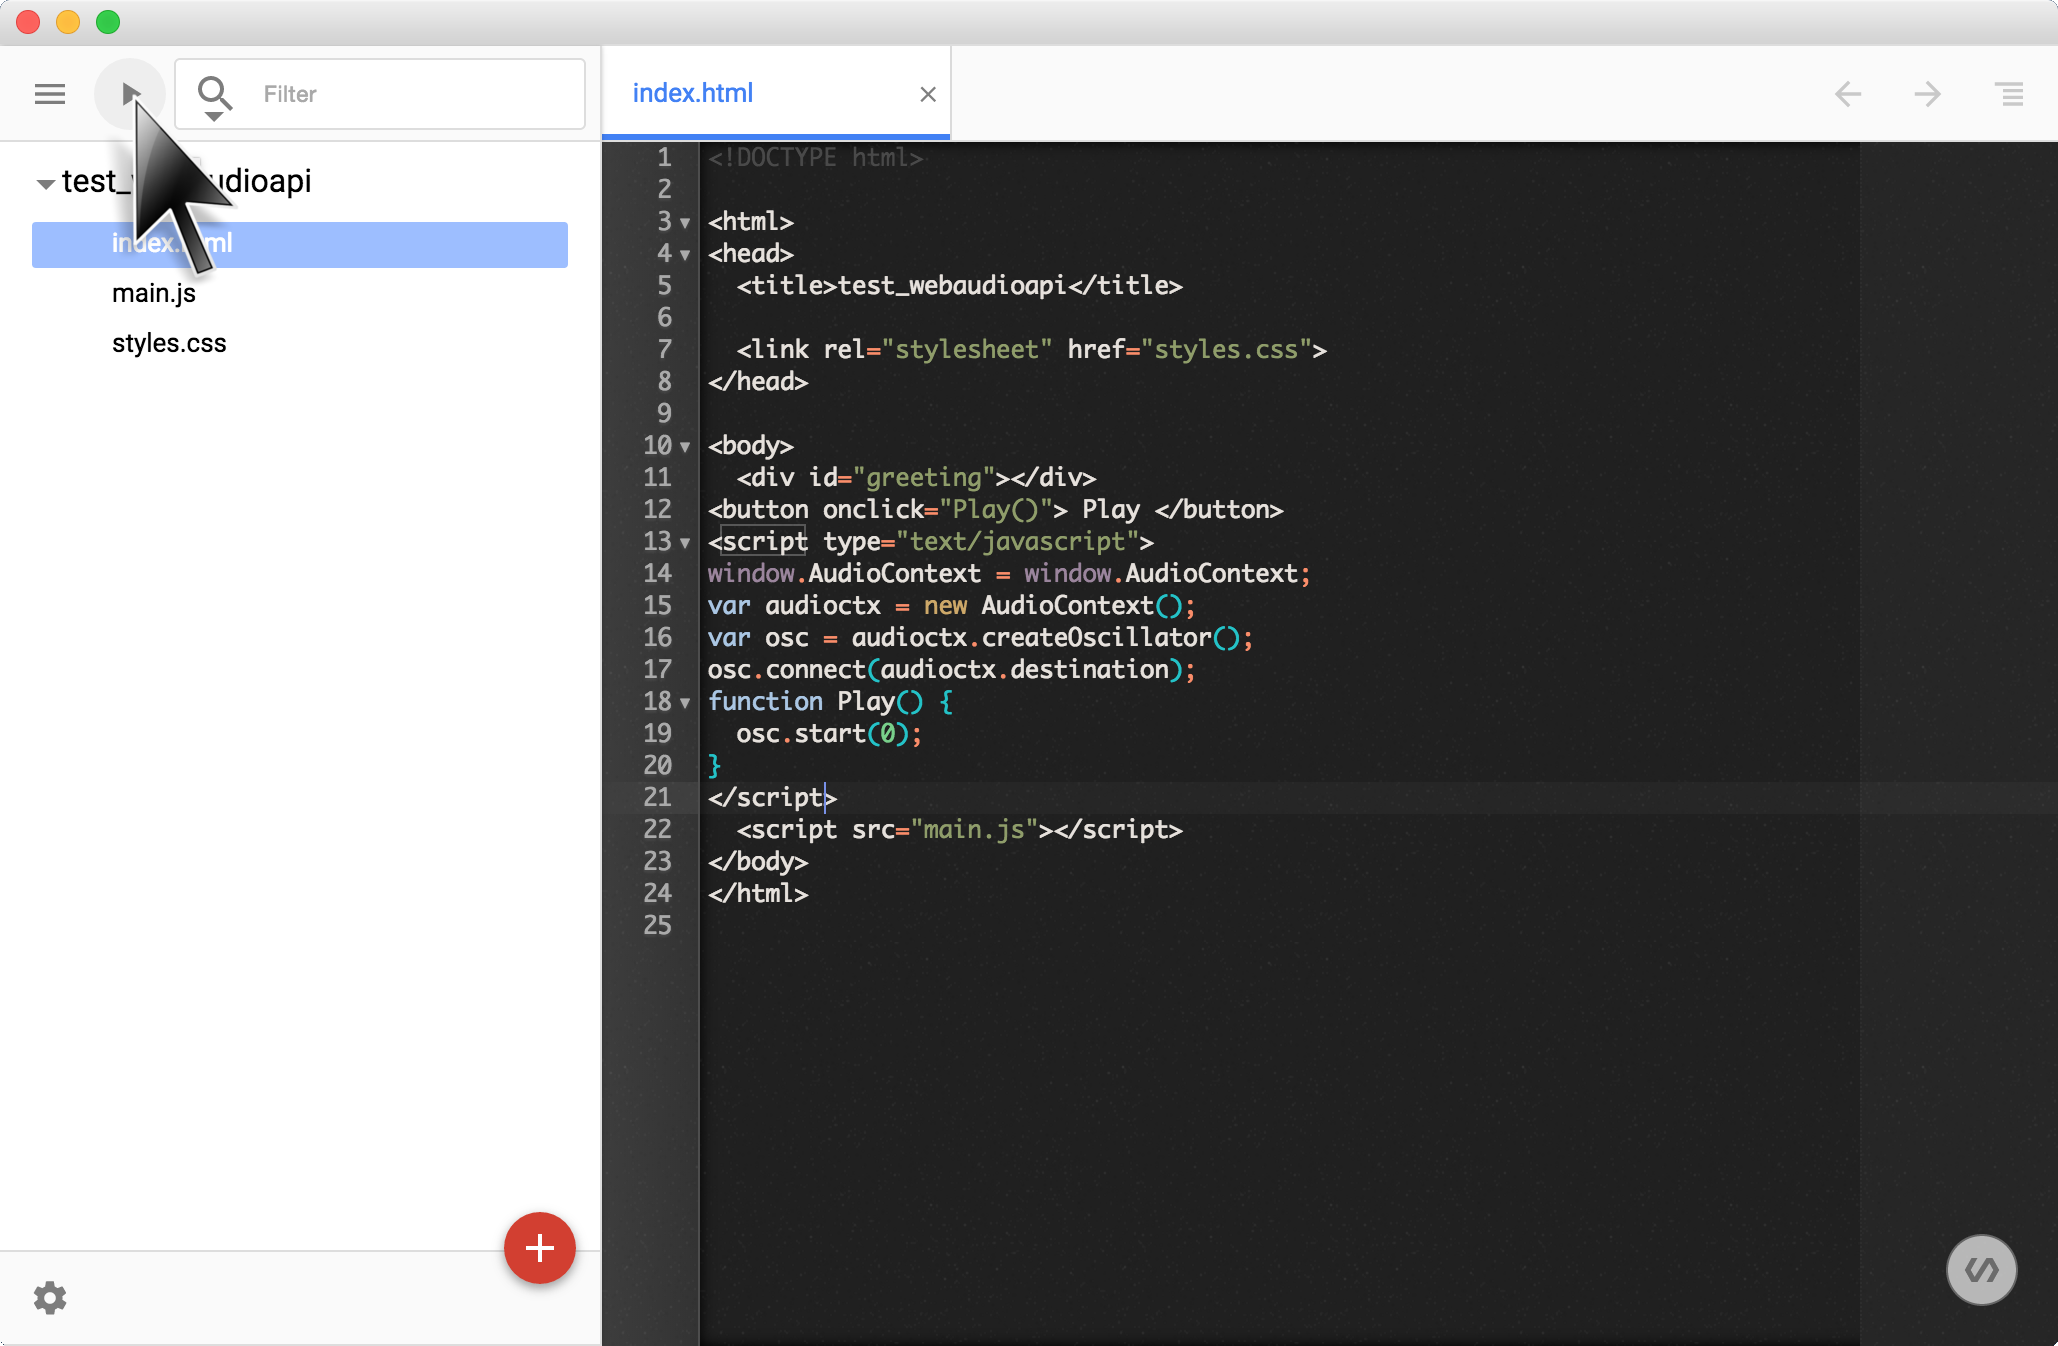
Sucess when playing sound with clicking/tapping button in the brower window. In this code does NOT care to stop playing sound. Please reload this page to stop the sound.
Creating Node Graph by following process below.
- Creating AudioContext by
new AudioContext();. - Creating Oscillator by
audioctx.createOscillator();. - Complete Node Graph by connecting to destination by
osc.connect(audioctx.destination);. - Start Oscillator by clicking/tapping button.
Oscillator is the one of the primitive parts in Web Audio API, and those primitive parts are named "Node". Lots of these kinds of primitive nodes are prepared by default. Basically, a way of creating application with Web Audio API is by connecting these node each other, and creates Node Graph.
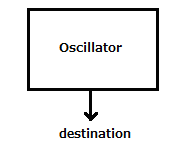
And the end point of Node Graph is named destination (destination node). The destination node is automatically created when AudioContext is constructed. Node Graph is ready to play sound by connecting to the destination node.
By the way, Node Graph which has created is just like this diagram.
(From next step, omit explanation how to run the application.)
Oscillatro is able to create sound, but the sound is a bit monotone. So let's try to swing the oscillator by another oscillator.
Delete code added in previous step from index.html, and add new code below to index.html.
Application is working properly when this is reproduced. Sound is played by clicking button. And then clicking button with changing parameters in the textboxes reflects to the swing of the sound.
- VCO Freq = 440
- LFO Freq = 5
- Depth = 10
Explanation for new words.
- VCO : [Voltage-Controlled Oscillator] Oscillator which Oscillator which controls frequency of oscillator by voltage.
- LFO : [Low Frequency Oscillator Oscillator] Low frequency Oscillator
Basic idea is that by controlling frequency of oscillator, which making sound, by another oscillator makes swing of the sound. And the width of the swing is called depth.
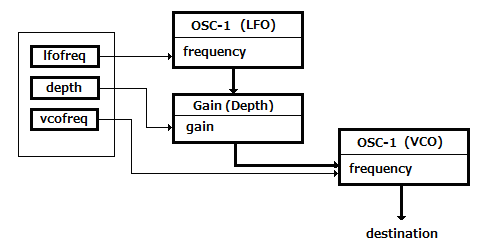
About Node Graph of this step.
- Creating AudioContext by
new AudioContext(); - Creating Oscillator which makes sounds by
audioctx.createOscillator(); - Creating Oscillator which controls frequency of the oscillator making sounds by
audioctx.createOscillator(); - Creating Node to change depth parameter by
audioCtx.createGain(); - Connecting to audioctx.destination to completed Node Graph by
vco.connect(audioctx.destination); - Connecting to depth for the swing by
lfo.connect(depth); - Connecting to Oscillator which making sound by
depth.connect(vco.frequency); - Starting Oscillator and updating parameter by clicking/tapping button.
Node Graph which has created in this step is just like this diagram.
Download snare.wav, and drop the downloaded file into "Project name("test_webaudioapi" in here) area" of left pane of Chrome Dev Editor.
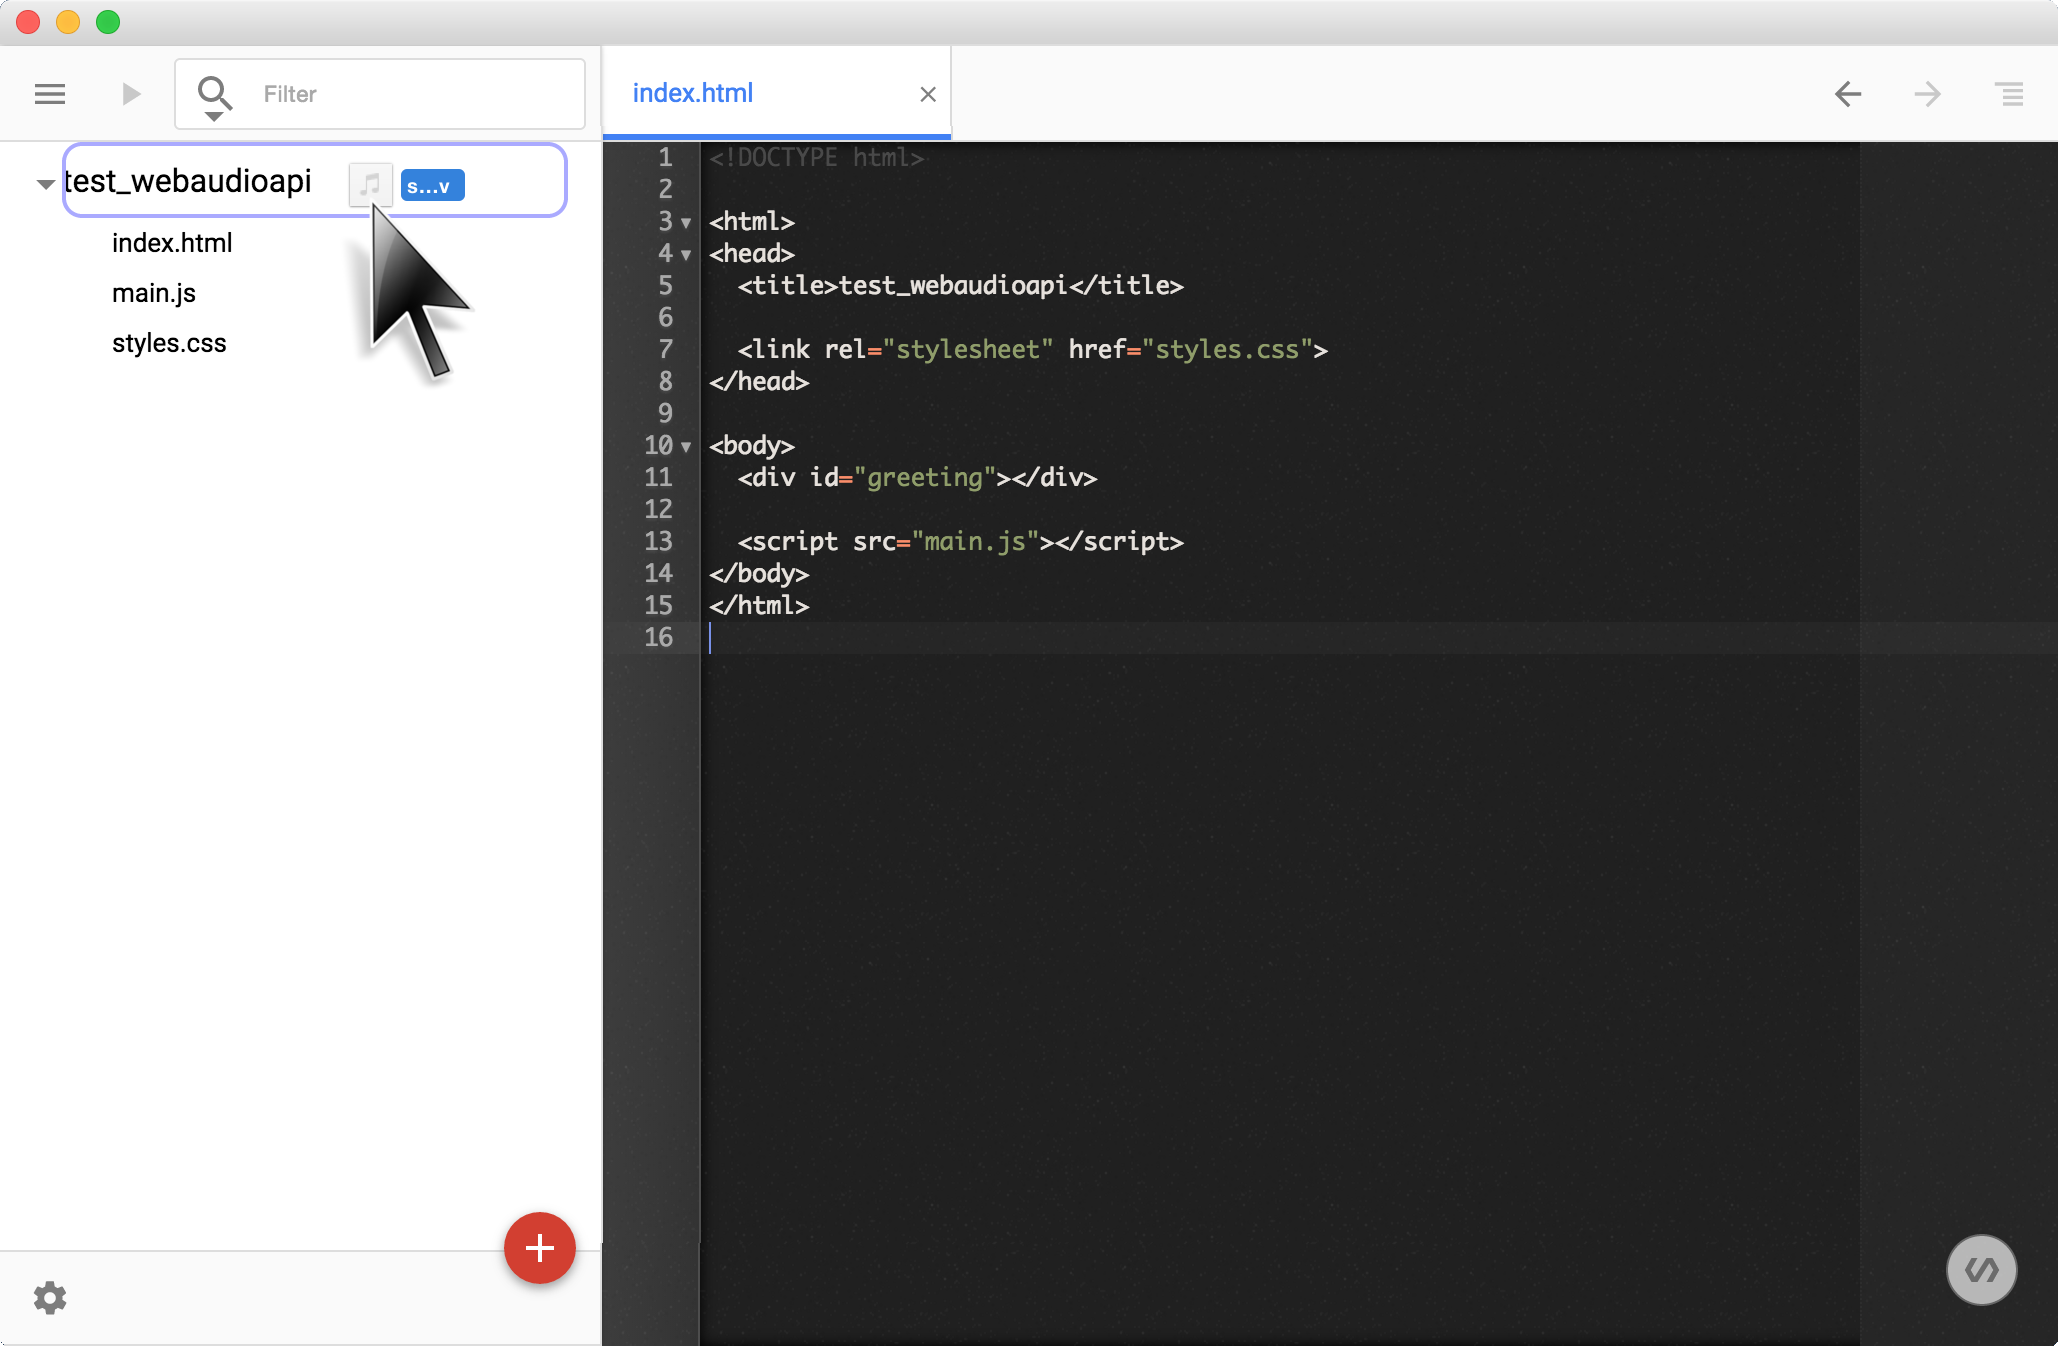
Delete code added in previous step from index.html, and add new code below to index.html.
Application is successfully created when to be heard snare drum sound by clicking/tapping button.
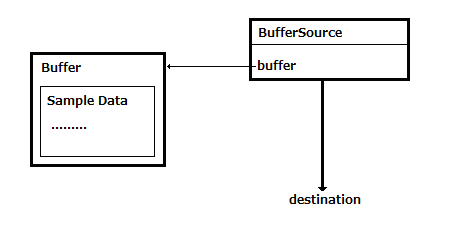
Algorithm is below.
- Fetching file by
fetch()from server - Copy sound data to buffer is prepared by
audioctx.createBufferSource(); - Connecting to audioctx.destination to complete Node Graph by
src.connect(audioctx.destination); - Play sound in the buffer by clicking/tapping button
Node Graph which has created in this step is just like this diagram.
Using audio file that has long duration than audio file that is used at previous step.
So, please download loop.wav, and drop the downloaded file into "Project name("test_webaudioapi" in here) area" of left pane of Chrome Dev Editor.

Next, delete code added in previous step from index.html, and add HTML code below to index.html at first.
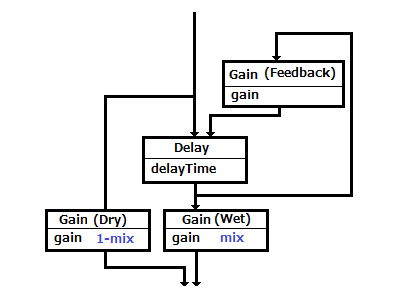
At this step, diagram below is the target Node Graph to create.
Explanation for new words that has just appeared.
- Dry : A sound that is originaly input.
- Wet : A sound that is applied audio effect to original input.
- Audio Effect : Creating different sound by applying something. For example, Delay is one of the audio effect that records an input signal to an audio storage medium, and then plays it back after a period of time, Reverb is also one of the audio effect that is the persistence of sound after a sound is produced.
Roles of these nodes
- Gain(Dry) and Gain(Wet) : Control the ratio of original sound and audio effected sound.
- Delay : Playback sound after some duration.
- Gain(Feedback) : Feedback delay effected sound to original source.
Explanation of Node Graph.
- Connect input to Delay and Gain(Dry)(Dry側のGain)
- Connect output from Delay to Gain(Wet)
- Connect output from Delay to Gain(Feedback)
- Connect output from Gain(Feedback) to Delay
Finally, write event handler for clicking/tapping button.
From the beginning of this codelab Event Handlers are write inside of HTML, but from here Event Handlers are written by JavaScript.
After adding 3 of above, run the application. Clicking/tapping button makes sound playing, and changing parameter and check/uncheck the chackbox of ByPass makes on/off delay effect.tapping button makes sound playing, and changing parameter and check/uncheck the checkbox of ByPass makes changing the depth and on/off of delay effect.
- Bypass:
Adding nodes below to obtain each audio effect by same way of adding delay node.
- PannerNode : to allocate sound to each speakers
- BiquadFilterNode : fillter a sound ( e.g: low-pass, high-pass, etc)
- GainNode : control amplitude (controlling volume)
Analyser node is providing users to visualizing sound. With this node, visualizing sound is really easy. Let's visualize sound file.
Use loop.wav, which is used in previous step, to analyse sound.
If you have not downloaded this file, please download from here, and drop the downloaded file into "Project name("test_webaudioapi" in here) area" of left pane of Chrome Dev Editor.

Next, delete code added in previous step from index.html, and add HTML code below to index.html at first.
Node Graph is below, since visualize input source without adding any audio effects.
Adding Analyser node after BufferSource node.
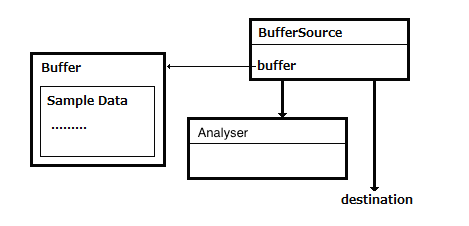
Adding process of drawing a graph from numbers which is provided from Analyser node.
Drawing by DrawGraph(), and also this method updated the drawing when parameter in the windows is updated. Explation for drawing.
- Create analyser by
createAnalyser(); - Specify the data size of FFT as fftSize
- Get values from Analyser node with running animation loop by
requestAnimationFrame();makes updating drawing on canvas in each iteration to visualize values.
Finally, add event handler for when clicking/tapping button.
After adding these 3 blocks of code, run the application. Clicking/tapping button to play songs and displaying graph in canvas. And be updated graphs with changing parameters of Frequency/TimeDomain.
※ In this page, clicking/tapping graph area makes changing the type(Frequency/TimeDomain) of the graph.
In this step, visualizing the sound from Mic(realtime input).
Here, adding code to previous step. So do not delete the code, please.
Add HTML to index.html. Adding HTML in where you want to add.(place is not important)
Next, adding JavaScript code. Same as HTML that is added previously, place to add is not important, so please add them where you want to add.
Node Graph is below, since visualize mic input without adding any audio effects.
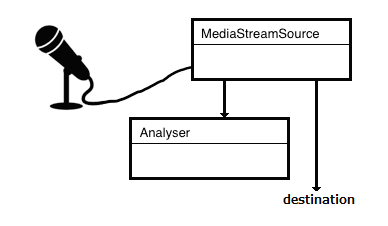
Algorithm is below.
- Get mic input by
getUserMedia();. - Get Audio Stream from stream by
audioctx.createMediaStreamSource(stream) - Connect Audio Stream that is just obtained to analyser by
micsrc.connect(audioctx.destination); - Connect Audio Stream that is just obtained to audioctx.destination by
micsrc.connect(audioctx.destination);to complete Node Graph - Clicking/tapping button to start visualizing mic input.
Run application by clicking/tapping . Changing of parameters(e.g. Frequency/TimeDomain) make graph style update.
※ in here, clicking/tapping graph makes changing the graph style.
Adding audio effect by convoluting source audio input/file and impulse response audio file.
It sounds difficult, but Web Audio API is providing ConvolverNode by default to make convolution by really easy way.
Download impulse response audio file form here s1_r1_bd.wav, and drop the downloaded file into "Project name("test_webaudioapi" in here) area" of left pane of Chrome Dev Editor.

※ The file just downloaded(s1_r1_bd.wav) is only provided in here, and is provided for free when the use case is in non-commerical.
Delete code added in previous step from index.html, and add new HTHL below to index.html.(place is not important)
Next, add JavaScript below
Convolver Node is intermiating in between input source and destination. So Node Graph here looks like this
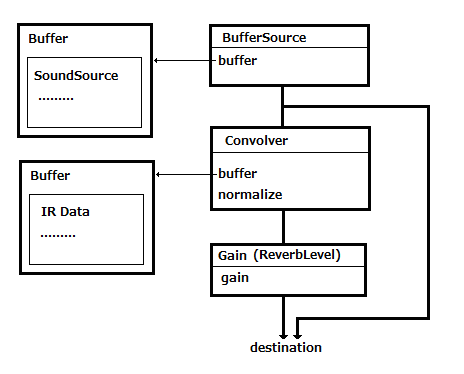
Finally, write event handler for clicking/tapping button.
Run application by clicking/tapping button to playing sound from audio file. To change the audio effect level is available by updating slider.
- ReverbLevel : 50